
Ender 3
a Popular fully Open Source 3D printer - github / r/ender3 / klipper config
see also
- Creality Ender-3… it’s time to move on. - there are better option tody (2023)
- Build A 3D Printer Workhorse, Not An Amazing Disappointment Machine
Hardware - Creality store - 2019 / 235€
Manual Bed Leveling
3 points bed leveling customization
Most of the process can be assisted by Klipper
Belt tensioning
Montage
The Ender 3 runs on 24V, and fan as well.
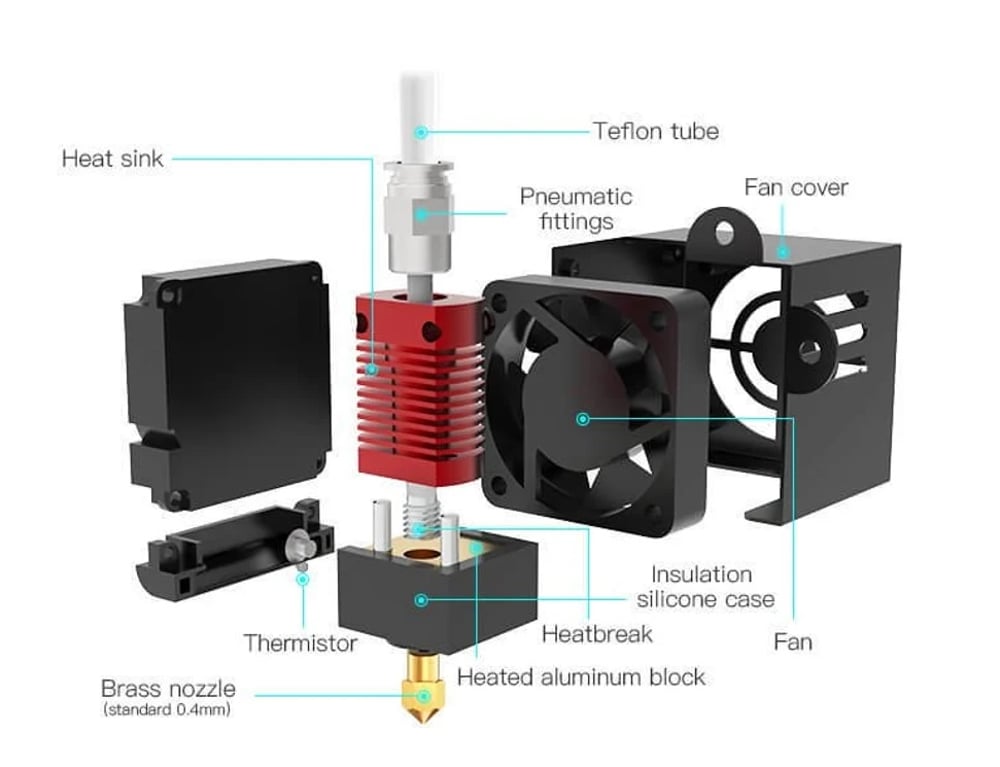
Hot end / M6 thread
- Ender 3/CR-10 hotends use MK8 nozzles with M6 threads / 2
- Changing Nozzles & Bowden Tubes
- Ender 3 Stock Extruder maximum volumetric flow?
- With a 0.4mm nozzle, printing at 210 degrees my max volumetric flow rate is 5.24mm3/s. - I had success printing at 60mm at 0.3 so thats not true. The maximum throughput i believe is 12 mm3/s
Board Creality (1.1.4 standard) - Wiring
Arduino 1284P, without any bootloader installed.
Firmware
Hardware upgrade
SKR Mini E3 V2.0 - 47€
- Wiring Guide - pinout - 1x1 compatibility creality x skr
- TMC 2209
- linear advance compatible
- gcode control & driver diagnostics
- thermal runnaway (tested)
- bip when thermal is unplugged
- BL touch wiring - sensor: PC14, control: PA1
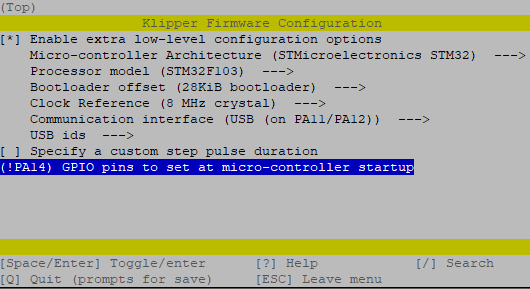
For building firmware, select in make menuconfig:
- Micro-controller Architecture : STMicroelectronics STM32
- Processor model : STM32F103
-
Bootloader offset : 28KiB bootloader
- Select Enable extra low-level configuration options
- Ensure that the Clock Reference is set to ‘8 Mhz’
- Ensure that Communication Interface is set to USB (instead of serial)
- Ensure that GPIO pins to set at micro-controller startup includes ‘!PA14’.
 ,
,
Firmware Flashing
The make flash command does not work on the SKR mini E3.
Instead, after running make, copy the generated out/klipper.bin file to a file named firmware.bin on an Fat32 SD card and then restart the SKR mini E3 with that SD card.
wait a minute.
If successfull the file should have been renamed to ‘firmware.cur by the SKR mini E3.
To check: Once klipper is uploaded, it can be used for flashing.
Stepper Current
The steppers on e3 are rated for 580rms for x,y,z and 650 for the extruder.
PID calibration
Alternative
Direct drive
Spool holder with bearing
reduces underextrusion for high loaded spool
Orbiter Extruder
Current 500 mA peak, 0.350A RMS Teflon rube 10mm higher than the base of the orbiter.

Possible Mount
Alternatives
BLTouch
Other
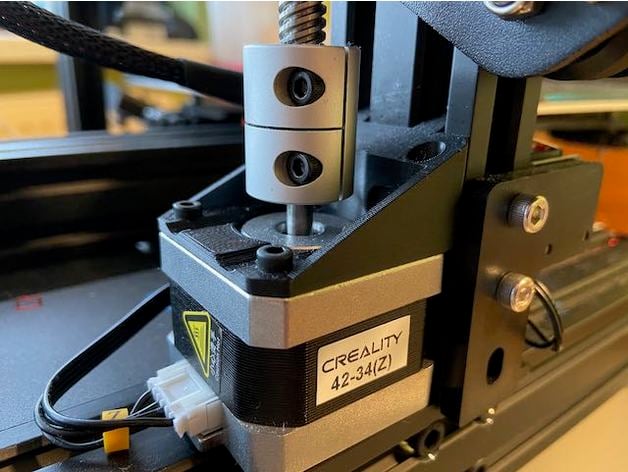
Dual Z axis
Cutomisation
- The best cheap or free Ender 3 upgrades - re-modding my newest version
- Filament guide
- back Cable Clip - no need for chain
- extruder knob
-
PSU Fan Silencer using stock screw.
- Mounting Pi Camera on Ender3
- Add an OctoPrint Touchscreen to Your Ender 3
- 7 easy 3D printed upgrades for your Ender 3
Custom Head / Vent
Tiki3 (version 3.2) / thingiverse

BlokHead / thingiverse (previously)
- Direct Drive Model / 5015 FAN
- Simple Head - BASE FILE - DUCT FILE
- Bullseye
- same as Petsfang Duct head
- allow better overhang and bridge print
Alternative
- Hero Me Gen 5 (2020) / Hero Me (2018)
- ring vent => not usefull
- ero Me Remix - Dual 5015 Fan Mod Gen 2
- no improvement (slow print)? HERO ME FAN DUCT and Fixing the Cooling Fans on ENDER 3
- Ender 3/CR-10 FANG
- cr-10/ender-3 fang - Using stock fan / connect directly to heatsink
- Radial Fang 5015 90deg
Comparison
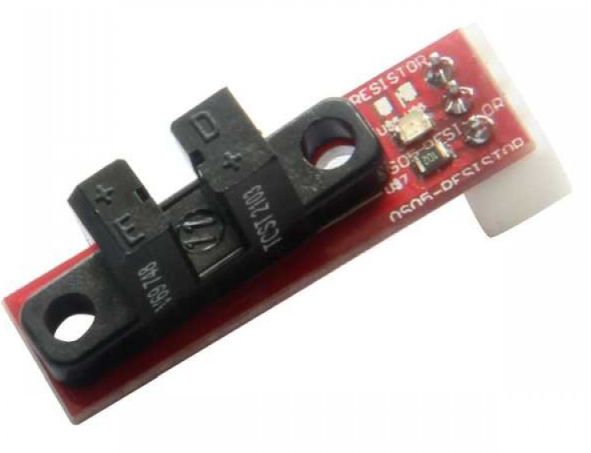
Filament – Runout sensor
- Filament runout sensor - selection and installation
- DIY filament runout sensor + M600 colour changing
AntiWobble

Double extruder
Fan
- I recommend the 24v 4020 Sunon. It’s 40x40x20mm, 21 dBA, and 24v.
Speeding
- I am using on my ender 3 with stock extruder, seems ok so far printing at 150mm for drafts and about 125/135 for detail work.
pressure_advance: 1.05
pressure_advance_lookahead_time: 0.010
-
The speedboatrace event is what got me to finally try klipper and fine-tune my Ender3 for reliable speeds. I’ve always been very hesitant about tampering with speeds and acceleration, but after a lot of trial and error (and help from an ADXL345 accelerometer and the ever-helpful TT calibration and tuning guide ;) ) I’ve found that I can reliably work at around 5k accel and 150mm/s, which is leagues above my usual comfort level of 500//60mm. No 10min benchy for me, but I’ve at least gone down from 1h45 stock to now less than 30mins with a negligible loss in quality (in particular, top surfaces seem to curl up around the extrusion lines a bit; I assume that’s either still a cooling issue or just an artifact of the faster moving nozzle pulling on the laid-down filament more).
-
I got my modified Ender 3 to 16 minutes. I can barely get above 5k acceleration, but it’s still crazy fast to watch
- what kind of mods are we talking about. SKR RRF, micro Swiss all metal hotend, BMG clone direct drive, dual 5020 blowers, linear rails on all axis, dual Z with integrated lead screws. Upgraded the Y stepper to a bigger motor with a smaller pulley, so lots more torque. Adjustable metal belt tensioners. Sitting on a concrete paver on top of foam. Plus a million other small little things.
-
Stock CREALITY Ender 3 Settings Speed: 50mm/s -> 100mm/s Acceleration: 500 -> 1 000mm/s² (if this doesn’t change time, it’s because acceleration are capped see below)
Jerk X 15 mm/s Jerk Y 10 mm/s
Temperatures Hotend: 230°C Heated bed:40°C
- 0.25 height, between 0.4 and 0.5 width
- 2 perimeter
- 10% infill
-
3 bottom and top shell
- Bedslingers are slow they said. 11:16 Slicer-cura Speed-707mm/s (cura max) Accel-10k mm/s^2 Gembird abs 310 hotend 110 bed 0.5/0.25 nozzle/layer
Hotend - tl dragon regular flow Hydra dd and part cooling Stock ender 3 v2 board
- Ender 3 Speedboat - 5:30
- Lasse Dalegaard Lasse Dalegaard il y a 3 semaines X axis linear rail, custom toolhead, Sherpa Mini extruder, Dragon HF hotend, flexible coupler for Z rod, SKR E3 Turbo, Quickdraw probe. I think that’s all of it. Sounds like more than it is when listing it :-)
- yes the bed is unmodified except replacing the bed springs with stiffer ones(just realized I had done that)
- I run high currents(close to the rated limit), along with spread cycle of course. The speeds are also kept low to stay below the motor pullout speed. However, the real magic sauce making this possible is Klipper’s input shaping implementation.